 Owncast now supports custom plugins.
 Packaging & publishing plugins
A plugin's distribution format is the .ocpkg file: a single bundle containing your plugin.manifest.json, your plugin code, your public/ and assets/ directories, and optionally an icon and an instructions document. That one file is everything a server admin needs to install your plugin.
Building the package
- JavaScript
- Python
- Native WebAssembly
npm run package
npm run package only rebuilds when the bundle is missing. After changing source, run npm run build first so the package doesn't ship stale code.
owncast-plugin-py package my-plugin
Use your language toolchain to compile the module, then package it as a ZIP with
the canonical plugin.wasm filename. The
Native WebAssembly guide includes build
commands for Rust, TinyGo, and AssemblyScript.
The resulting <your-slug>.ocpkg contains the manifest and runnable code. It can also include the plugin's public/ and assets/ directories.
The JavaScript and Python packagers run the built plugin through owncast-plugin-test --load-only before writing the archive. This uses the same install-time load path as a real server, covering register(), manifest and runtime agreement, and permission-gated subscriptions. Native WebAssembly authors run owncast-plugin-test directly before packaging. See Native WebAssembly: Test before installing.
The file is self-contained. Share it however you like:
- Attach it to a GitHub release
- Host it on your own server
- Hand it to an admin over chat or email
Plugin icon
Drop an icon.png at the root of your project (alongside plugin.manifest.json) and the packager bundles it into the .ocpkg automatically. The admin UI fetches it from /api/plugins/<your-slug>/icon and renders it in the plugin list and in the sidebar entry for any plugin that ships an admin page.
my-plugin/
├── plugin.manifest.json
├── icon.png              bundled automatically
├── src/
├── public/
└── assets/
Notes:
- No permission required. The host serves the icon directly. You don't need
http.serve. - The icon is separate from action button icons, which live in
public/(web-served) and are referenced by theiconfield of anactions[]entry. See UI: Action buttons.
Instructions
Drop an INSTRUCTIONS.md at the root of your project (alongside plugin.manifest.json) and the packager bundles it into the .ocpkg automatically. The admin UI fetches it from /api/admin/plugins/<your-slug>/instructions and renders it as markdown in an Instructions tab on the plugin's detail page.
my-plugin/
├── plugin.manifest.json
├── INSTRUCTIONS.md          bundled automatically
├── src/
├── public/
└── assets/
Use this for setup steps, configuration notes, what permissions are requested and why, and anything else an admin needs to know after installing. Plugins without one show no Instructions tab. The filename is fixed (INSTRUCTIONS.md). No http.serve permission required.
The file is admin-facing, so write it for the streamer who installed your plugin and is opening the admin UI to figure out how to use it. README-style developer-facing notes belong in your repo's README instead.
What's inside a .ocpkg
plugin.manifest.json- One code entry:
plugin.js,plugin.py, orplugin.wasm icon.pngif you provided oneINSTRUCTIONS.mdif you provided one- The contents of your
public/directory if you have one (web-served at/plugins/<slug>/) - The contents of your
assets/directory if you have one (host-read for manifest fields that inline content)
The code filename selects the runtime. A native module must be named plugin.wasm inside the archive, regardless of the plugin slug.
Build inputs such as node_modules, package.json, pyproject.toml, Cargo.toml, and uncompiled source do not belong in the package. They produce the code entry that the server runs.
Loose native WebAssembly files
During development, a native module can be installed without creating an .ocpkg. Copy the module and manifest into data/plugins/ with the same basename:
data/plugins/
├── my-plugin.wasm
└── my-plugin.manifest.json
Owncast scans for the .wasm file and reads the matching .manifest.json. The packaged .ocpkg format is still recommended for distribution because it keeps the code, manifest, and optional assets together.
Installing on a server
In the Owncast admin, open Plugins in the sidebar and click Upload plugin. Pick your .ocpkg and the server installs it in place. The new plugin appears in the list immediately.
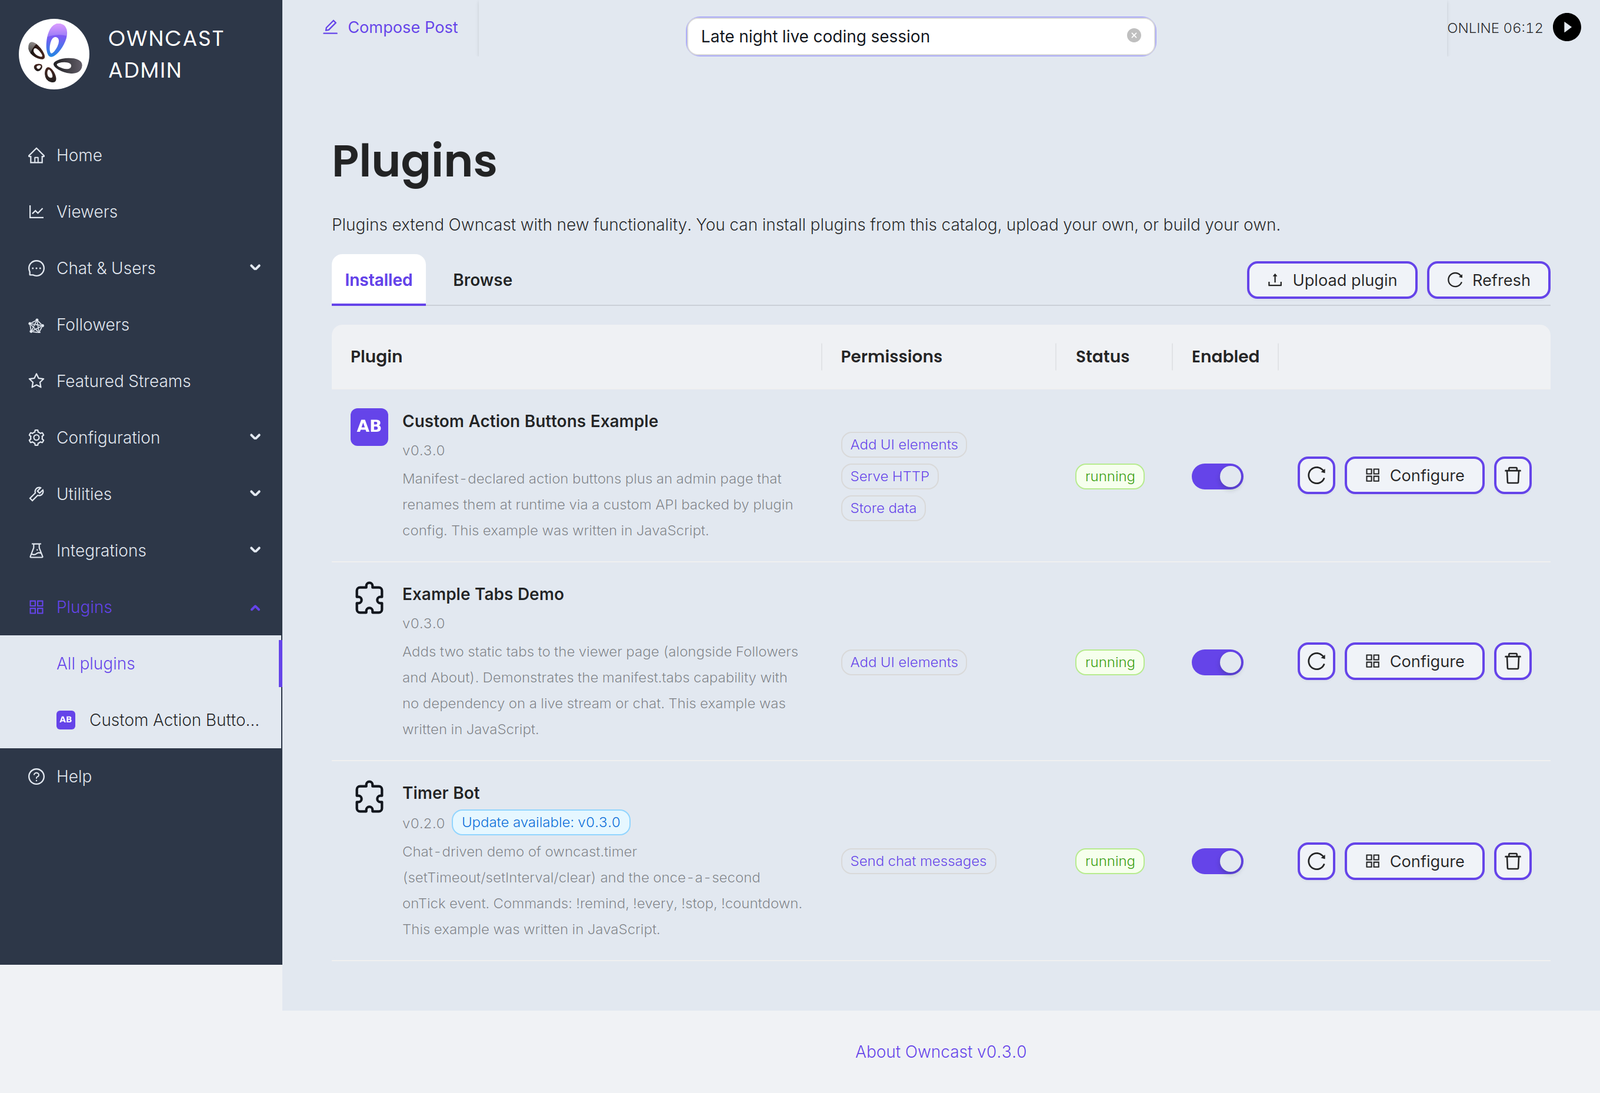
If the admin UI isn't an option (automation, no browser access, scripted deploys) you can also drop the .ocpkg directly into the server's data/plugins/ directory:
scp my-plugin.ocpkg user@your-owncast-server:/path/to/owncast/data/plugins/
The server scans this directory periodically. The plugin appears in the admin's Plugins page within a couple of seconds.
In either case, finish the install in the admin:
- Click your plugin in the list to open its detail view.
- Review the Permissions tab. These are exactly what your manifest declared.
- Toggle Enabled to load the plugin. The first enable also captures the approved permission set.
Updating an installed plugin
To ship an update, replace the package file in data/plugins/ directly, or install the new version from the admin's Browse tab if you publish to the directory. The manifest's slug is the identity key: the new contents replace the existing entry with the same slug, whatever the file was called. To force an immediate reload of an enabled plugin, click Reload on its row.
Uploading from the admin's Plugins page only installs a new plugin. An upload whose slug already belongs to an installed plugin is rejected ("uninstall it before uploading another plugin with the same slug"), so uninstall the old one first if the admin upload is your only update path.
Two files in data/plugins/ that declare the same slug are also a conflict. Owncast keeps the first one it finds, ignores the other, and logs which package was skipped.
What happens when permissions change
- You removed permissions. Silent. The plugin reloads with the smaller set.
- You added permissions. The old approved version keeps running (it holds only the approved permissions) and the new package waits as pending, with a "needs re-approval" badge in the plugin list. The admin reviews the new permissions in the Permissions tab (new entries are tagged) and clicks Approve to accept the expanded set and load the update.
A plugin's effective capabilities never grow without explicit admin consent, even across updates.
Bumping the version
Bump version in plugin.manifest.json whenever you cut a release. It's what admins see in the plugin list and what the registry uses to tell releases apart. The host doesn't gate loading on it: update identity is the slug, and the load-time check compares slug and permissions, not version.
Versioning is for humans. Semver is recommended but not enforced.
Disabling and uninstalling
- Disable keeps the plugin installed but stops loading it. The admin's choice is persisted across restarts. Toggle Enabled back on to load it again.
- Uninstall removes the plugin entirely. From the admin's Plugins page click the trash icon on the plugin's row and confirm. (You can also remove the
.ocpkgfromdata/plugins/directly, and the next scan picks up the deletion.)
Distribution checklist
Before you publish a plugin:
- The manifest declares only what you use. Drop unused permissions. The narrower your ask, the easier the admin's trust decision.
descriptionis filled in. Admins see it in the plugin list and during install. One sentence covering what the plugin does.versionreflects what you're shipping. Semver is conventional.- The README in your repo explains what it does, what permissions it asks for and why, and what to configure (env vars, admin-page settings, and so on).
- Tests pass. Your SDK's test command should be green.
- The icon is included if you have one.
- An
INSTRUCTIONS.mdships with anything an admin needs to know after install: setup steps, configuration notes, why each permission is requested. Plugins with non-obvious behavior or required configuration should ship one. Trivial plugins (a hello-world chat handler) don't need it.
Publishing to the directory
Listing your plugin in the public directory at owncast.directory is optional. A .ocpkg is self-contained, so you can always hand it to an admin directly. The directory just makes your plugin discoverable and gives admins one-click install and updates.
A few manifest fields shape your listing, so fill them in first: name (the display name), version (bump it for every update), slug (your permanent identifier, see Manifest), description (the one-line summary on your card), permissions (keep them minimal, admins review them), and an optional icon.png.
Sign in
The directory uses passwordless, magic-link sign-in. Go to owncast.directory/plugins/login, enter your email, and click the link in your inbox. Your email is your author identity, tied to the plugins you own. On your account page you can set an optional display name that appears as the author on your listings.
Submit
Go to owncast.directory/plugins/submit and upload your .ocpkg. The directory reads your manifest, validates the package, and publishes the version. Submission is done through the website, with no command-line publish step today. The form also takes a few optional extras: a preview image (a screenshot, PNG or JPEG up to 5 MB), a homepage link, browse tags, and a summary that overrides the manifest description.
Ownership and updates
- The first submitter owns the slug. When you publish a slug for the first time, it is bound to your account and nobody else can publish under it. A submission for a slug owned by another author is rejected.
- Each version is published once. To ship an update, bump
versionin your manifest, re-package, and submit again. - Manage your plugins at owncast.directory/plugins/account, where you can see everything you have published and remove a listing.
What operators see
In the directory's Browse view your plugin shows its name, author, description, icon, latest version, and preview image if you uploaded one. When an admin installs it, Owncast shows the permissions your manifest requests, renders your INSTRUCTIONS.md, and lists any chat commands you register. That metadata is what an operator uses to decide whether to trust and enable your plugin, so write it with that reader in mind.
Where to go next
- Manifest reference for the full list of manifest fields.
- Permissions for the trust model and the full permission list.
- Example plugins: JavaScript · Python.
Improve this page
See something missing or incorrect? Edit this page and improve the documentation for everyone.
 Gabe Kangas
Related Documents
- Configuration via PluginsLet admins configure your plugin with typed settings. Owncast renders the form, you read the values at runtime with owncast.config.get.
- Extend Owncast with pluginsWrite plugins that run sandboxed inside Owncast to react to chat, post to the fediverse, serve HTTP endpoints, and add UI.
- Testing pluginsDrive your built plugin through the real Owncast runtime with mocked side effects. Scenario tests, assertions, fixtures, HTTP auth.
- Chat pluginsBuild chat bots, moderation tools, and message filters for Owncast plugins using chat handlers and owncast.chat APIs.
- Contributing web UI with PluginsAdd admin pages to the Owncast admin UI and action buttons to the viewer chrome.
- Serving HTTP via PluginsServe URLs from your plugin, write dynamic handlers, gate admin endpoints, and push realtime events to browsers.